🖤 Learn how to create the lazy daisy stitch with this easy, step-by-step tutorial. The lazy daisy stitch is a wonderful technique to add to your collection of easy embroidery stitches. It’s simple, versatile, and ideal for beginners—making it a perfect choice for your first embroidery project.
This stitch was one of the first techniques that truly drew me into embroidery. I would often come across it in various embroidery inspirations on Pinterest, and at first glance, it seemed deceptively simple. Upon closer inspection, I realized just how easy it was to learn, and now I’m excited to share it with you. Perfect for beginners, it’s not only one of the easiest embroidery stitches to master but also incredibly versatile, particularly for creating beautiful floral designs.
In this embroidery stitch tutorial, I’ll walk you through each step so you can master the lazy daisy stitch in no time. Whether you’re an experienced stitcher or just starting with embroidery for beginners, this stitch will quickly become a favorite in your projects. You can use the lazy daisy stitch to create delicate petals for flowers, embellish clothing, or decorate home accessories. If you’re new to embroidery, this easy stitch is the perfect place to start, and by the end of this tutorial, you’ll be well on your way to creating beautiful, textured floral designs with the lazy daisy stitch.
Step-by-Step Lazy Daisy Stitch
Let’s get started! This little stitch is actually quite simple. It’s essentially a closed loop, secured to the fabric with a small tie stitch. Known as the detached chain stitch, it’s basically just a single chain stitch. Let’s dive in!
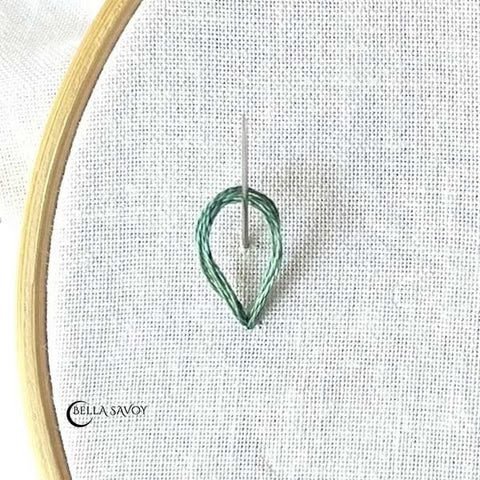
Come up through the top of your fabric, then return your needle back into the same hole (or as close to it as possible), leaving a small loop behind. Next, bring your needle up halfway through the inside of the loop at the top. Hold the needle in place with one hand while gently pulling the thread through at the bottom until it snugly hugs your needle. This step helps create the perfect loop shape for your stitch.
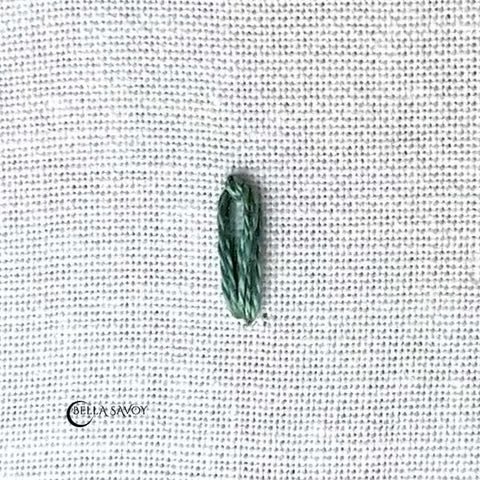
Next, pull your needle and thread through, making sure not to pull the loop too tightly, or it will lose its round shape. To finish your lazy daisy stitch, create a small stitch to secure the loop. Push your needle to the back just outside the loop, near the spot where you last brought it up. This will hold everything in place and complete the stitch.

Tips
-
When you’re working on your lazy daisy stitch, you might notice that the length of your loop affects the thickness of your stitch. Longer loops tend to create thinner petals, so if you’re aiming for fuller, fatter petals, try shortening your loops or using more thread. On the other hand, if you want your loops to appear rounder, you can experiment by keeping your loop slightly looser or adding more thread to your needle. The added thread will fill in the space a bit more, giving your petals a fuller look. It’s all about finding the right balance!
-
I recommend playing around with different thread counts and tension levels as you create each loop. Pay attention to how the thread hugs your needle during the step where you pull it to the back. Everyone has their own favorite combination, and the beauty of embroidery is that you get to experiment and discover what works best for you. This trial-and-error process is the fun part, so don’t hesitate to try new techniques to perfect your lazy daisy stitch!
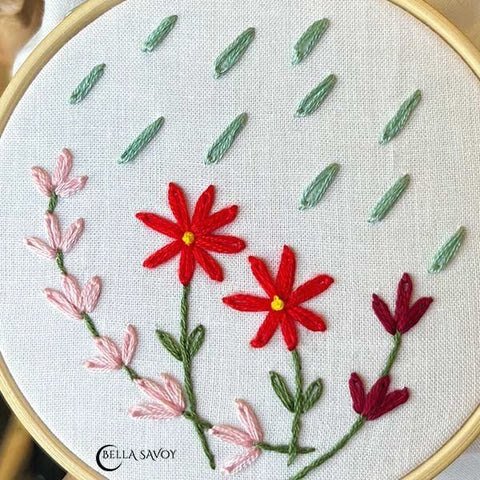
Use the lazy daisy stitch on its own to create a simple rain drop or group them to make things like flowers.
By the way, the lazy daisy stitch also goes by the name detached chain stitch. If you already know how to create a chain stitch or have read (or viewed) my chain stitch tutorial then you’ll know why. They’re almost cousins!
As always, here’s a video tutorial to end the lesson.