

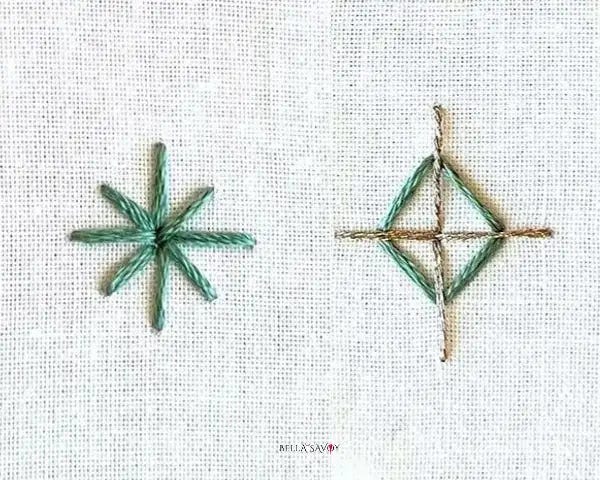
The star stitch is a fun and easy embroidery stitch that adds a charming touch to any design! Whether you’re sprinkling in tiny stars, adding delicate sparkles, or just building some texture into a larger piece, this stitch makes a big impact with very little effort. It’s one of those stitches that looks more complex than it is — which makes it especially satisfying for beginners.
At its core, the star stitch is simply a set of seed stitches radiating out from a single center point. If you’ve practiced straight stitches before, you already have the foundation. In this tutorial, you’ll learn how to stitch it step by step, plus a bonus diamond cross stitch that pairs beautifully with it. I’ll also share some tips for using metallic thread, which takes this stitch to the next level.
Disclosure: As an Amazon Associate, I earn from qualifying purchases at no extra cost to you.
Click here for a FREE EMBROIDERY PATTERN
Star Stitch
The star stitch is made up of eight straight stitches, all meeting at a center point. Using dots as guides makes it much easier to keep the shape even, especially when you’re first learning.
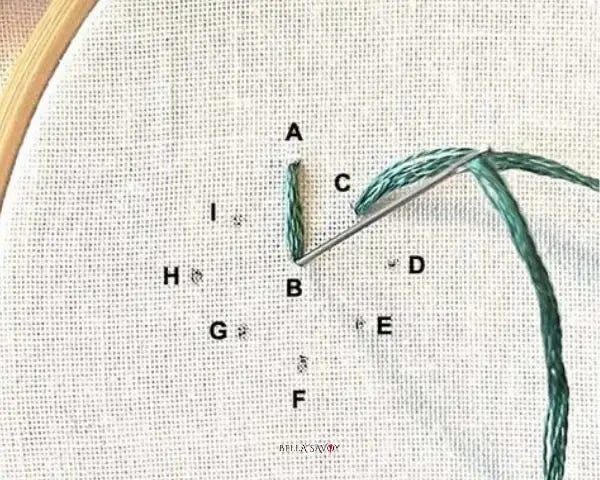
Draw dots onto your fabric to form a diamond shape with one dot in the center. Place dots at the top, bottom, left, and right, then add one dot between each of those — eight outer dots total.
Bring your needle up at an outer dot (A) and insert it back down at the center (B). That’s your first stitch.
Come up at the next outer dot (C) and return to the center (B).
Continue all the way around, always coming up from an outer dot and returning to the center, until all eight stitches are in place.
The key is consistency: always come up at the outside and go down at the center. This keeps your stitches lying flat and your star looking tidy. Once you’ve gone all the way around, you’ll have a neat little star — easy peasy!
Tips for a neater star stitch:
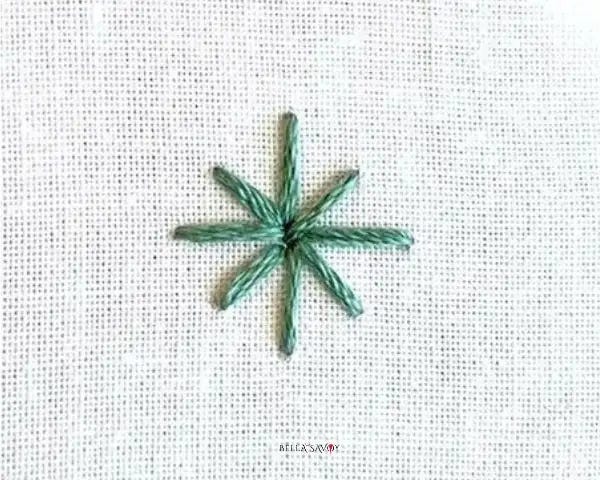
Keep your outer dots evenly spaced so the star looks balanced. A light pencil mark or water-soluble pen works great for this.
Try to keep all your stitches a similar length. Even a small difference can make the star look lopsided.
For a denser, more solid look, use more strands of floss. For a delicate, airy star, use just one or two.
Diamond Cross Stitch
This is a little bonus stitch that I love using in my PDF patterns — it pairs beautifully with the star stitch and looks especially striking when made with two different thread colors.
Start by drawing 8 dots onto your fabric as guides: four inner dots forming a small diamond, and four outer dots positioned at the top, bottom, left, and right.
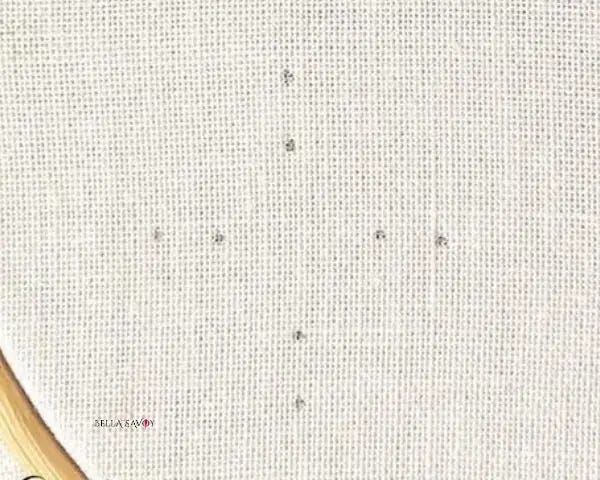
Step 1 — Stitch the diamond: Connect the inner dots with straight stitches to form a small diamond shape:
A to B
C to B
D to C
A to D
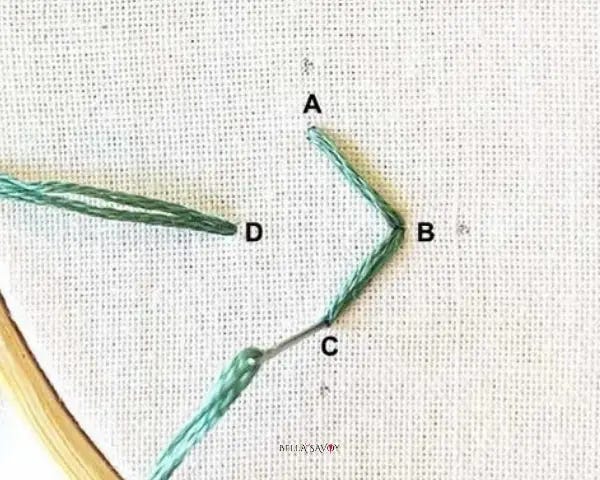
Step 2 — Add the cross: Using your second color (or the same color, if you prefer), add a straight stitch from each outer dot to the center, forming a cross that lays over the diamond.
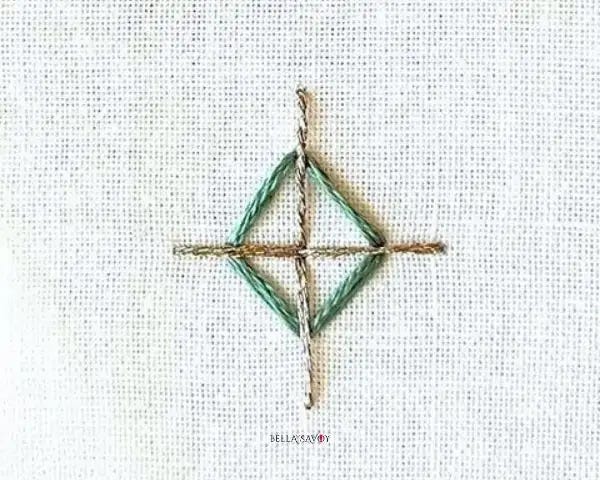
That’s all there is to it! The layered effect of the diamond underneath and the cross on top gives it a lot of visual interest for such a simple stitch. Try it in two complementary colors for maximum impact.
Using Metallic Thread
Metallic thread is one of my favorite ways to use the star stitch — it turns a simple accent into something that genuinely sparkles. That said, metallic thread behaves differently from standard embroidery floss, and it can be frustrating if you’re not expecting it. Here are a few tips to make the experience smoother:
Practice on a scrap first. If you’ve never worked with metallic thread, get a feel for it on a spare piece of fabric before committing it to your actual project.
Pull gently and slowly. Metallic thread has a tendency to snag or twist if you rush. Take your time with each stitch.
Avoid reusing the same hole too many times. The texture of metallic thread means it can catch on itself or the fabric weave when passing through a tight spot. Make holes that are close together rather than identical.
Use a larger needle. A slightly bigger eye and shaft creates a wider passage through the fabric, giving the thread more room to move cleanly.
Work with shorter lengths. Metallic thread frays and weakens with repeated friction through the fabric, so shorter strands stay in better condition. Around 12–14 inches is a good starting point.
Choose fabric with a looser weave. Thick or tightly woven fabric makes the issues above worse. Quilting cotton or linen works well.
Once you get the hang of it, metallic thread is absolutely worth the extra care. The french knot is another accent stitch that looks beautiful in metallic — worth trying once you’re feeling confident!
Ways to Use the Star Stitch in Your Designs
The star stitch is one of those versatile accents that fits into almost any project. Here are a few ways to incorporate it:
Scattered accents. A handful of small star stitches scattered across a piece adds sparkle and visual interest without overwhelming the design. Think fireflies, snowflakes, or stars in a night sky.
Floral centers. A star stitch worked in a contrasting color makes a lovely center for a simple embroidered flower, especially when surrounded by lazy daisy or chain stitch petals.
Border details. Evenly spaced star stitches along the edge of a design or inside a geometric border create a clean, decorative effect.
Filling small shapes. For tiny areas that are too small for a full satin stitch fill, a few star stitches can do the job nicely and add texture at the same time.
Combined with the diamond cross stitch. These two stitches are a natural pair — try alternating them in a scattered pattern or using them together to fill a geometric shape.
Small as it is, the star stitch earns its place in your toolkit. Check out my stitch library for more tutorials to keep building your skills!
Happy stitching!