🖤 Let’s dive into this tulip stitch tutorial and create some cute little flowers! The tulip stitch is a beginner-friendly embroidery stitch that’s simple to master and looks just like tiny tulips, which is exactly what makes it so charming. This stitch is a great starting point for anyone new to embroidery, and it’s a perfect addition to any flower embroidery project.
The tulip stitch is not only great for creating sweet miniature tulips, but with a little creativity, you can also use it to make a variety of other beautiful designs. It’s perfect for making small flowers, but you can also think outside the box—perhaps even using it to create snowflake patterns or adding it as a textured element to larger designs. Whether you’re working on a flower embroidery tutorial or experimenting with new ideas, this stitch adds lovely detail and texture that brings any project to life. Happy stitching!
Table of Contents
How to Make a Tulip Stitch
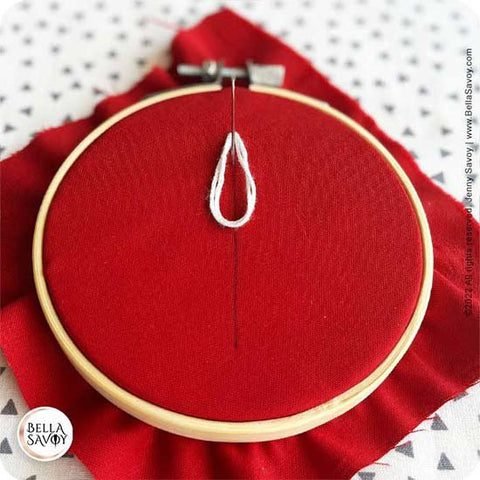
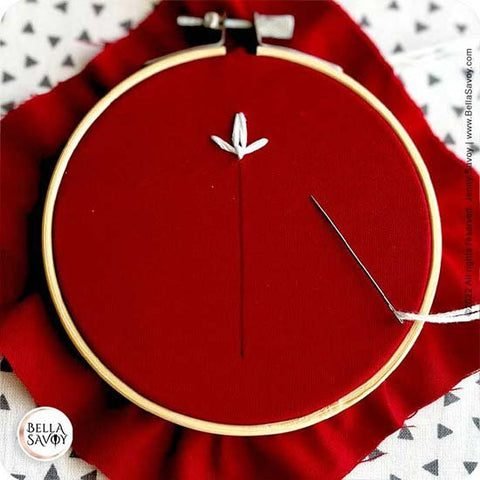
The tulip stitch starts with a lazy daisy stitch (aka detached chain stitch).
I’ve drawn a vertical guideline and will start at the top.
-
Make a small loop at the very top. Just come up and return through the same hole (or as close to it as you can).
-
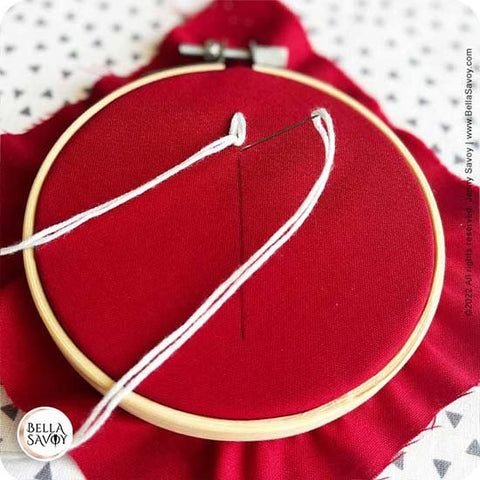
Then come up through the loop, about a stitch length away and pull through.
Optional:
Before pulling the needle all the way through the loop, leave it halfway in the fabric and gently pull the thread from the back so the loop hugs the needle. Then pull the needle through. I find that it’s a little less wear and tear on the thread.
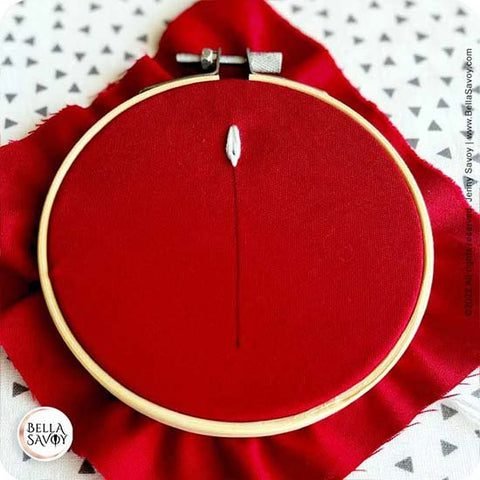
Next, create a little tie stitch to hold your loop down.
All you have to do is return to the back just below your loop. This stitch can be short or long. Just be sure it’s not too small or too tight. You’re going to need a little wiggle room to push thread through it in the next step.
Now, make a ‘V’ under your lazy daisy stitch.
-
Come up to the side of your stitch. Then push your needle through the small stitch this is holding down your loop and pull it through.
-
You can start on either side and the length can be short or long.
Return to the back on the other side to finish creating the ‘v’ shape. That’s all there is to it!
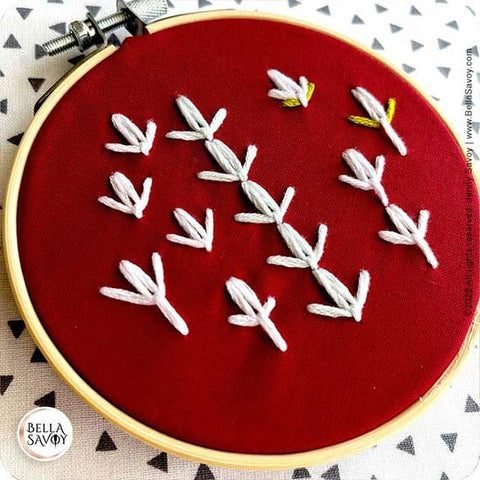
Variations
The tulip stitch can be used alone or grouped. They can be stacked like this to resemble a spine which is perfect if you’re creating things like skeletons for Halloween!
Here are a few ways you can vary it up.
-
Make the stitch that holds down the loop longer to create a ‘stem’.
-
Group them randomly for an organic look.
-
Stack them with a short stem to create a spine-like appearance.
-
Stack them with a long stem.
-
Make the ‘V’ a different color.
-
Add two ‘v’s. Make the second ‘v’ a different color.
I hope you’ve enjoyed this quick embroidery stitch tutorial! Try adding the tulip stitch to things like your collar, the sides of your socks, dog bandanas, napkins, or anything else you can think of. Adding even the tiniest of details is all you need to make your creations a bit more unique and personal. These small touches are not only fun but can be a part of your cozy hobbies, offering a great way to relax and practice self-care. Whether you’re crafting gifts or simply embellishing your own items, the tulip stitch adds that special something that makes everything a little more thoughtful. 🙂