

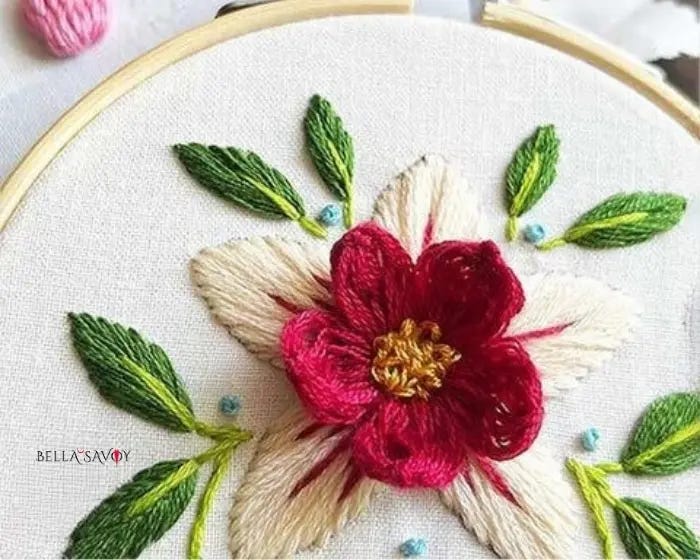
Learn how to make the popcorn lazy daisy stitch to take your embroidery work to another level!
This one is so much fun once you get the hang of it and it’s going to add gorgeous volume and texture to your work that just might push your embroidery to the next level.
I love using this stitch for some of my flower embroidery designs and it turns my flat work into a piece that literally has parts that can be moved and manipulated. You could say it gives things a little bit of life.
It’s not a stitch I would recommend as a beginner because it takes both hands, some extra coordination, and a bit of patience. There’s an element of awkwardness when first learning this stitch, and I think that’s probably true for most stitches, but with the popcorn lazy daisy stitch, it takes some getting used to.
If you’re a newbie, start with an easy embroidery stitch that’s beginner-friendly, such as the simple lazy daisy stitch, then come back and learn this one.
Disclosure: As an Amazon Associate, I earn from qualifying purchases at no extra cost to you.
Click here for a FREE EMBROIDERY PATTERN
How to Make the Popcorn Lazy Daisy Stitch
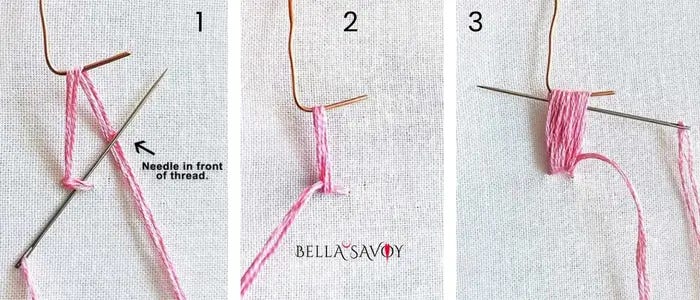
Add a small single stitch going side to side, then come up near the beginning of the stitch.
Create a row of loops using the small stitch as the anchor for the bottom.
Bring your thread over the wire from the front then go up the small stitch, making sure the needle goes over the working thread. (1)
Push the loop gently to the side of the little loop, and repeat to create more loops.
The wire is optional but does help keep the loops sizes consistent. You can leave the loops loose or use a safety pin too.
Next, slide your needle halfway up through the small stitch to finish your last loop (3).
Remove your copper wire, if you used one.
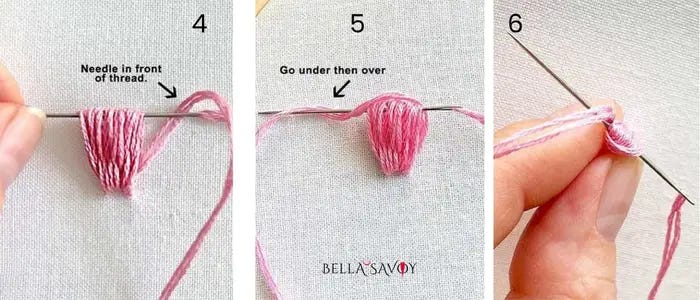
Hold your needle in one hand, and with the other, slide the tail of your thread behind the needle (4).
Bring the thread over your loops, then under and over the needle (5). You can wrap the needle once or twice, but once is plenty. A second wrap makes the tip of your petal slightly more pointy.
Pinch your loops together (6), then carefully pull your needle through to form a small knot at the top of your loops,
Push your needle to the back of your fabric if you want to hold the stitch in place.
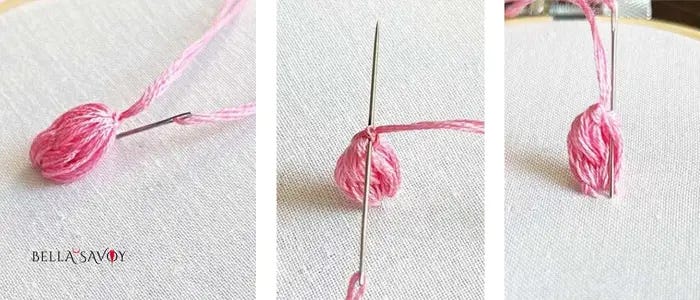
If you want your stitch to be a bit fluffier, stitch it down so it’s a bit shorter, and if you want less fluff stitch the top down farther from where it’s attached.
If you’d like your popcorn lazy daisy stitch to stand up and be more 3-dimensional:
Push needle through the top of your stitch from the front.
Then push your needle through to the front from the side of your popcorn lazy daisy stitch, and push it through the fabric below.
Be sure to hold onto the top of your stitch and do this slowly so you don’t pull too much through. This will give you a cute stitch that can be manipulated to resemble a floating flower.
This is definitely not a beginner’s stitch and does take some tries to get it right. Have fun practicing this adorable 3d embroidery stitch and figure out whether using a tool or not works best for you. Once you get the hang of it you’ll probably want to use it in a lot of your flower embroidery!
Video: Popcorn Lazy Daisy Stitch Flower Embroidery
In case you need a little more help with this, I’ve made a video to accompany this embroidery stitch tutorial. Happy stitching!
