

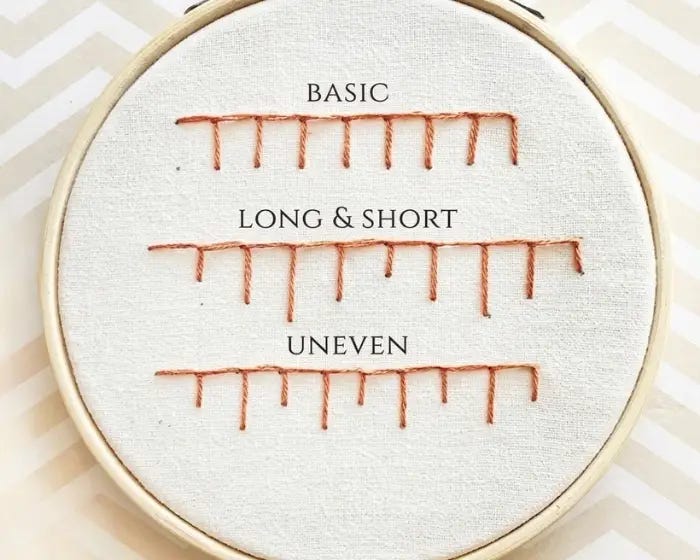
If you’ve been doing embroidery for a while, you probably already love the blanket stitch — but did you know it goes way beyond edging?
In this tutorial, I’m sharing 10 blanket stitch variations that open up a whole new world of creative possibilities. Use them to add beautiful design elements, create embellishments, or even stitch stunning flowers.
The blanket stitch is fun because of how flexible it is, and is a go-to for adding a felt backing or working with felt appliqué, but these variations take it so much further. I’ll walk you through a quick blanket stitch refresher first, then we’ll dive into each variation so you can see how they all build on the basics.
Whether you’re looking to try something new or just add more stitches to your toolkit, I think you’re going to love these. There’s even a step-by-step video so you can see each technique in action. Let’s get into it!
Disclosure: As an Amazon Associate, I earn from qualifying purchases at no extra cost to you.
Click here for a FREE EMBROIDERY PATTERN
Basic Blanket Stitch
Let’s start with the basic version:
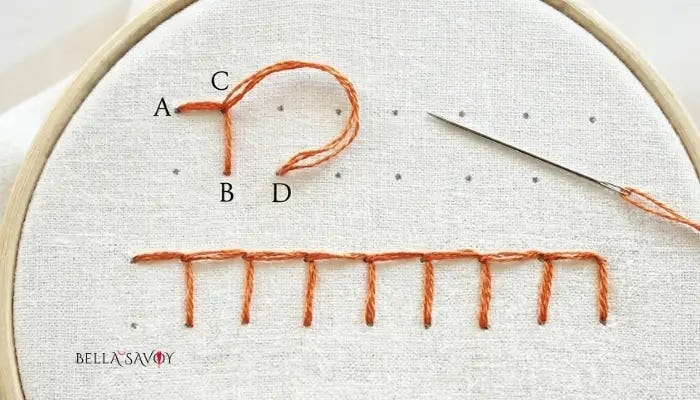
Create a stitch at an angle but keep it loose (A to B).
Come up at C which is directly above B and level to A, and bring it under your loose stitch.
Gently pull your thread through to form a right angle.
To make the next stitch, return to the back at D to create another loose stitch and continue this pattern.
QUICK TIP: to keep your stitches nice and neat it helps to gently hold your thread down where the angle is formed as you create your next stitch.
These basic steps create the groundwork for the following blanket stitch variations. So let’s get started!
10 Blanket Stitch Variation
1. Long and Short Blanket Stitch
The long and short and uneven blanket stitch are similar and often confused — don’t worry too much about the names. I’ll stick with what I learned when I first encountered them.
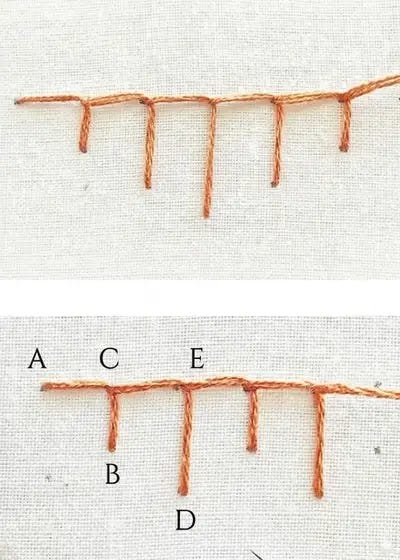
Follow the same steps as the basic version, but vary the height of your stitches for a scalloped effect. I use three heights — short, medium, and long — cycling back down, but feel free to adjust. (First image)
2. Uneven Blanket Stitch
Just like the long and short variation, but simpler: alternate between only two heights, one short and one tall. (Second image)
3. Double Blanket Stitch
This version is just 2 basic blanket stitches with one on top and the other created just below it turned upside-down. It’s also slightly offset. You can use the same color thread or mix it up with contrasting colors for a fun effect!
The two sets can touch but they can also be set slightly away from each other. It really depends on what you’re going for.

4. German Knotted Blanket Stitch
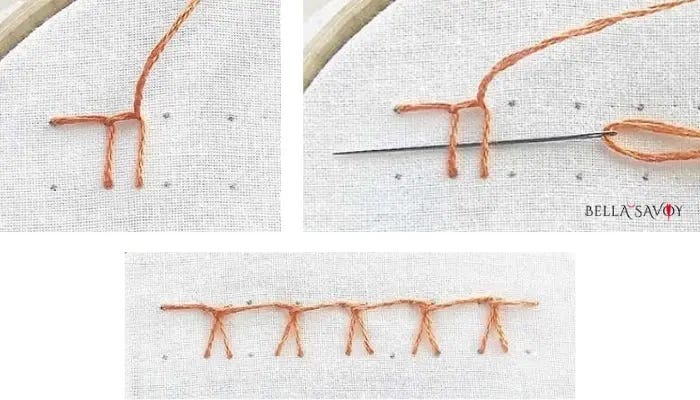
Once again, start with one basic blanket stitch. Then, create another but this time stitch it a bit closer to your first one.
Next, slip your needle under your two stitches, then pull your thread through to create a knot at the top.
Repeat these steps until you’re happy with the length of your stitch.
5. Closed Blanket Stitch
This version looks like a row of triangles which are all hanging on a line… or perhaps they look more like a row of little monster teeth?
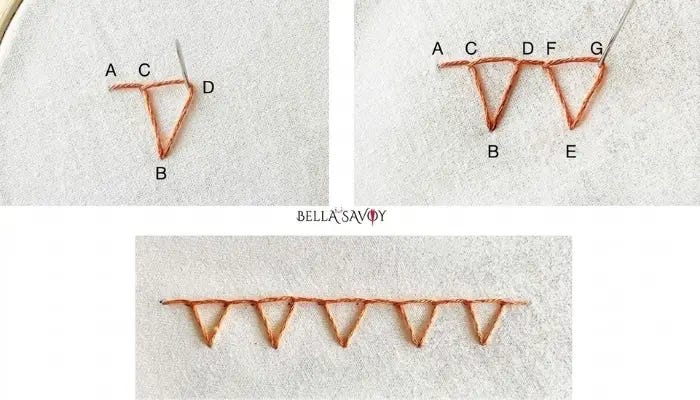
Start with the basic blanket stitch but when you come up at C it should be closer to A so it’s not directly above B. This will create an angle to help create the left side of the triangle.
To form the right side of your triangle, use your finger to hold the thread in place at C.
Return to the back at B (keep thread slightly loose on top) then come up at D under your loose thread.
To create your 2nd closed blanket stitch:
Return to the back at E (keep it slightly loose on top).
Come up at F below your loose thread.
Return to the back at E, keeping your thread loose on top.
Come up at G under your loose thread & gently pull your thread tight.
Repeat
6. Crossed Blanket Stitch
This variation will look like a row of X’s which are attached to each other along a line at the top. Start the same way as the closed blanket stitch.
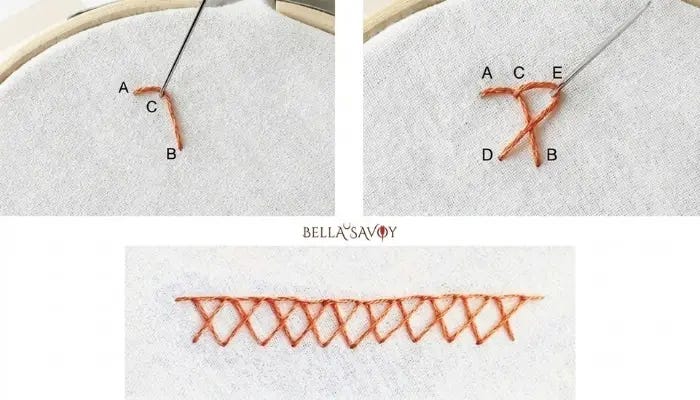
Form a loose stitch: come up at A then down at B.
Come up at C so it’s a bit closer to A and under the loose stitch.
Hold your thread down near C, then return to the back at D to form a loose stitch.
Come up at E below your loose thread & pull tight to form the ‘X’ shape.
Repeat these steps until you’re happy with the length.
To end your stitch add a little stitch at the top right or make it a little longer to mirror the beginning of your stitch.
7. Boxed Blanket Stitch
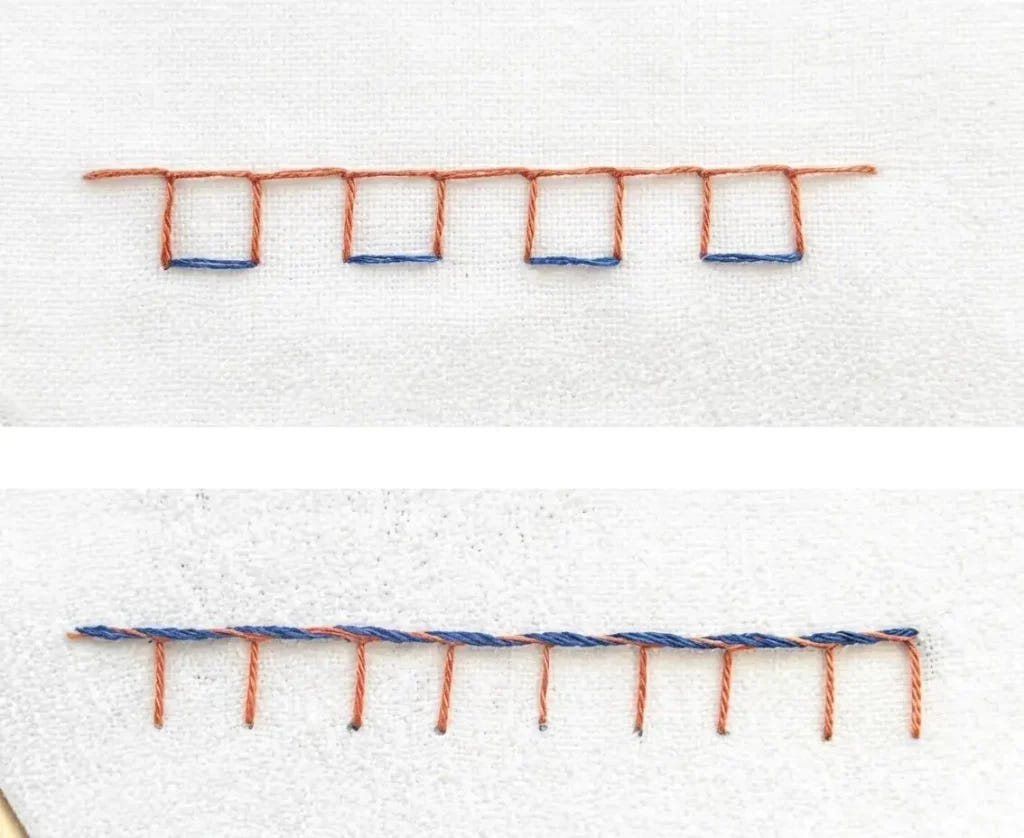
The boxed blanket stitch is a combination of the basic blanket stitch and the running stitch. First create your basic blanket stitch (in orange). Make a row of them and then add your running stitch (in blue) at every other open end to create little boxes.
8. Whipped Blanket Stitch
This one is also a combination of two stitches… your basic blanket stitch and the whipped running stitch. Use contrasting thread colors so you can see the whipped stitch.
Create your row using the basic blanket stitch. Next add a whipped stitch along the top. A whipped stitch just slips the thread around your existing stitch like a spiral.
9. Pinwheel
The pinwheel is essentially the basic blanket stitch created around a central point instead of a line. I’ve drawn in a circle with a dot for the center to use as guides.
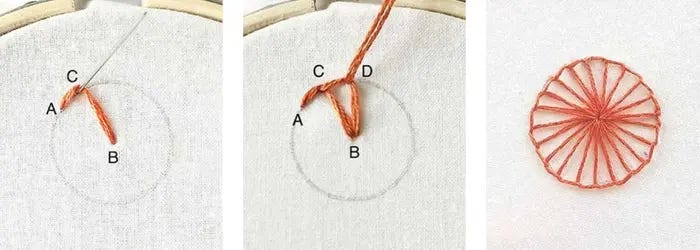
Start on the circle and come up at A. Return to the back at B (keep your thread slightly loose on top).
Then come up at C below the loose stitch, then gently tighten.
Repeat: Hold thread down at C with your finger, then return to the back at B & keep the thread loose on top.
Come up at D, below your loose thread, then tighten.
Each time you return to the back you’ll always do so at B, the center of your circle. Each time you return to the front you’ll do so along the circle. Repeat steps all the way around the circle.
10. Looped Blanket Flower Stitch
While it’s not exactly a blanket stitch it kind of is since the steps are similar. Loose blanket stitches are used to create loops that overlap each other along several layers of circles to create a 3-dimensional flower.

Draw a template consisting of a circle and 3 or 4 rings around the center. Fill the center with the satin stitch or french knots.
You can start from the circle closest to the center and work your way out but I think it’s actually easier in my experience to start from the outside.
Create a U-shaped loop (A to B), and push it out and flat to keep it out of the way.
Come up at C between (A and B) and return to the back ad D to form another U-shaped loop. Push it out of the way.
Repeat this all the way around the circle.
Repeat these steps for each circle, then fluff your petals.
You can leave the loops as-is or cut them for a unique variation.
Video Tutorial: Blanket Stitch Variations
I hope you enjoyed this embroidery stitch tutorial! It’s always so satisfying to add new techniques to your embroidery skills, and I’m sure these blanket stitch variations will bring a fresh touch to your next project.
Whether you’re stitching for a creative outlet or as a way to unwind, cozy crafts like these are perfect for practicing self-care and finding a moment of relaxation. Happy stitching!
