

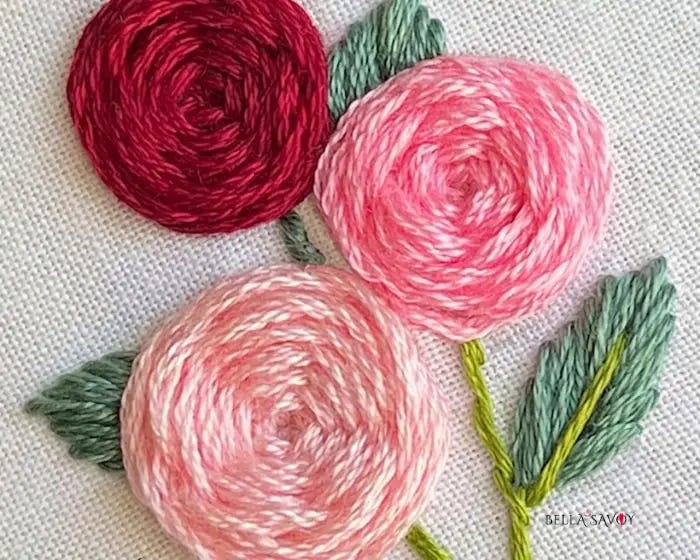
The woven wheel stitch is one of my favorite ways to add instant texture and dimension to an embroidery project. It creates a beautifully plump, raised circle that’s practically made for flowers — and it’s surprisingly simple to learn, even if you’re brand new to embroidery.
In this tutorial, I’ll walk you through every step of the woven wheel stitch, share my best tips for getting it just right, and show you how to build on it to create full floral designs.
Disclosure: As an Amazon Associate, I earn from qualifying purchases at no extra cost to you.
Click here for a FREE EMBROIDERY PATTERN
What Is the Woven Wheel Stitch?
The woven wheel stitch (sometimes called the ribbed wheel or spider web stitch) works by laying down a foundation of straight “spoke” stitches arranged like a pie, then weaving thread over and under those spokes in a circular motion until they’re completely covered.
The result is a round, raised stitch with a woven texture — perfect for flower centers, full blooms, berries, or any design element that needs a bit of volume.
Before You Start: Quick Tips
A few things that’ll make your woven wheel stitch turn out much better:
Use at least 6 strands of thread. Fewer strands means a flatter, less satisfying result — and it’ll take much longer to fill in. Six strands gives you that full, plump look.
Use a slightly longer thread than usual. There’s a lot of weaving and very little going in and out of the fabric, so a longer thread works well here. Just keep it manageable to avoid tangles.
Switch to the blunt end of your needle for weaving. If your needle keeps catching on the thread while weaving, flip it around and use the eye end — it glides through much more smoothly.
How to Do the Woven Wheel Stitch
Step 1: Create Your Spoke Foundation
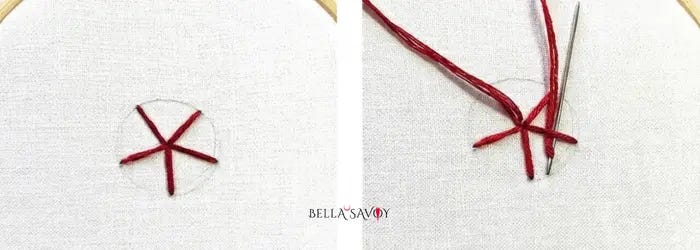
Draw a small circle on your fabric, then divide it into 5 equal sections like a pie. Stitch each dividing line from the center to the edge using straight stitches — these are your “spokes” and will hold your entire weave in place. A straight stitch is simply a line that goes from point A to point B.
You’ll need an odd number of spokes (5 is the standard), so the weaving pattern can alternate properly as you go around.
Step 2: Weave
Bring your needle up near the center of the circle. It doesn’t matter which section you start in.
Now begin weaving — go over the first spoke, under the next, over the next, and so on — working in a circular motion around and around. As you weave, gently guide the thread into place with your fingers so the rows sit snugly together.
Two things to watch for:
Tension matters. Don’t pull too tight (it’ll distort the shape) or leave it too loose (it’ll look floppy). I like to rest a finger lightly on top of the stitch as I pull the thread through — it helps me feel when the tension is just right. You’ll see this in the video below.
Running out of thread? End your thread after going over a spoke, and push the needle to the back just before the next one. Come up on the other side of that same spoke with your new thread and continue weaving. The join will be nearly invisible.
Keep weaving until the spokes are completely covered.
Step 3: Finishing the Woven Wheel
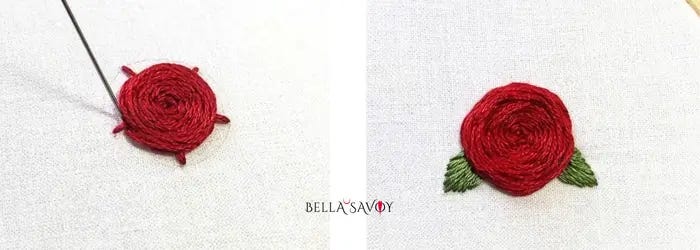
When you reach the outer edge, make sure the tips of all 5 spokes are fully covered. If any peek out, add a small stitch or two around the edge to tuck them in.
To finish, push your needle to the back and secure your thread. Then take the blunt end of your needle and gently fluff the stitch — this helps it puff up and look its best.
Adding Leaves
If you’re using the woven wheel to create a flower, leaves are a natural next step. The satin stitch pairs beautifully with woven wheel flowers — it’s simple, clean, and gives you that smooth, polished leaf shape.
More Tips for a Beautiful Woven Wheel Stitch
Take your time. This is true for any embroidery stitch, but especially here. Rushing leads to uneven tension and a lopsided result. Slow down, and it shows.
Experiment with color. One of my favorite things to do is start with one color at the center and switch to another partway through — it creates a gorgeous gradient effect and gives your flower so much more personality.
Use your fingers freely. Nudging the thread into place as you go is completely normal and actually helps you get a neater, more even result.
Video: Woven Wheel Stitch Tutorial
If you’re a visual learner, the video below walks you through the entire process from start to finish. Seeing the weaving motion in action makes it much easier to get the hang of tension and rhythm.
