

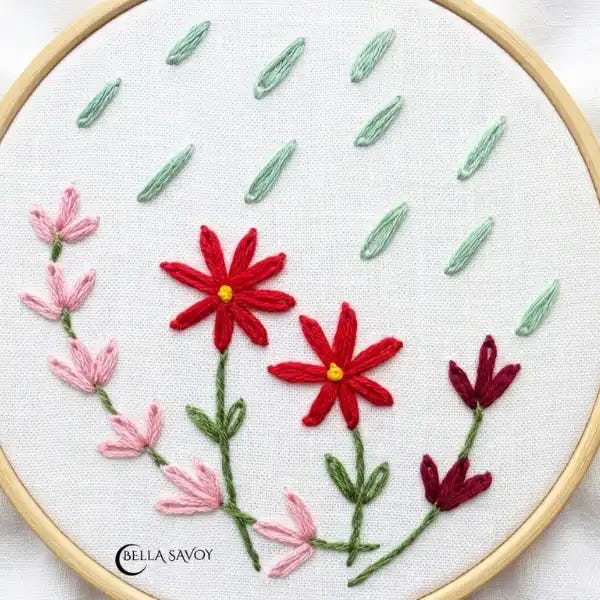
Learn how to create the lazy daisy stitch with this easy, step-by-step tutorial. The lazy daisy stitch is a wonderful technique to add to your collection of easy embroidery stitches. It’s simple, versatile, and ideal for beginners—making it a perfect choice for your first embroidery project.
This stitch was one of the first techniques that truly drew me into embroidery. I would often come across it in various embroidery inspirations on Pinterest, and at first glance, it seemed deceptively simple.
Upon closer inspection, I realized just how easy it was to learn, and now I’m excited to share it with you. Perfect for beginners, it’s not only one of the easiest embroidery stitches to master but also incredibly versatile, particularly for creating beautiful floral designs.
In this embroidery stitch tutorial, I’ll walk you through each step so you can master the lazy daisy stitch in no time. Whether you’re an experienced stitcher or just starting with embroidery for beginners, this stitch will quickly become a favorite in your projects.
You can use the lazy daisy stitch to create delicate petals for flowers, embellish clothing, or decorate home accessories. If you’re new to embroidery, this easy stitch is the perfect place to start, and by the end of this tutorial, you’ll be well on your way to creating beautiful, textured floral designs with the lazy daisy stitch.
Disclosure: As an Amazon Associate, I earn from qualifying purchases at no extra cost to you.
Click here for a FREE EMBROIDERY PATTERN
Step-by-Step Lazy Daisy Stitch
This little stitch is actually quite simple and so rewarding once you get the hang of it! It’s essentially a closed loop, secured to the fabric with a small tie stitch. Let’s dive in!
Create your loop
Bring your needle up through the front of your fabric. Then, return your needle back down into the same hole, or as close to it as possible, leaving a small, relaxed loop resting on the surface. Don’t pull it through completely just yet — that loop is the heart of your petal!Shape the loop
Bring your needle back up through the fabric halfway inside the loop, at the point where you’d like the tip of your petal to sit. Hold the needle gently in place with one hand while slowly pulling the thread through from below, until the loop snugly hugs the needle. This little pause is the secret to getting a beautifully round, even petal shape.
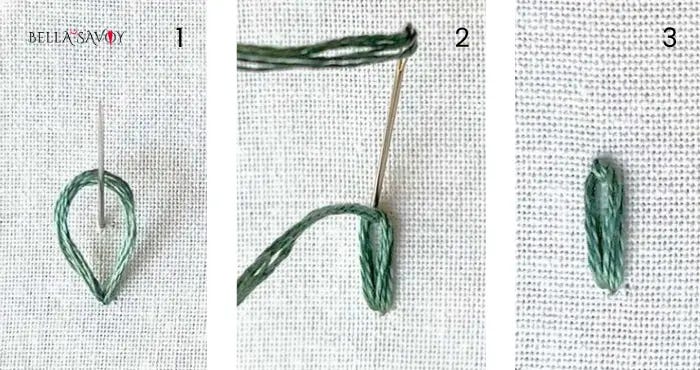
Pull through carefully
Now, gently pull your needle and thread all the way through — but take your time here! Pulling too firmly will tighten the loop and flatten that lovely rounded shape you’ve just created. Aim for a soft, relaxed tension that lets the petal keep its natural curve.Secure the stitch
To finish your lazy daisy stitch, create a small anchor stitch over the tip of the loop. Push your needle back down through the fabric just outside the loop, right near the spot where it last emerged. This tiny stitch holds everything neatly in place and completes your petal. And just like that — you’re done!
Tips to Create the Perfect Stitch
Start with the right thread tension — keep it relaxed rather than pulled tight. The loop that forms each petal should sit gently on the fabric, giving your daisies that soft, rounded shape that makes them so charming.
Anchor each petal with love — that tiny catch stitch at the tip of every loop is small but mighty. Make sure it’s snug enough to hold the petal in place, but not so tight that it pinches the loop out of shape.
Keep your petals a consistent length — before you begin, lightly mark the center and petal tips with an erasable fabric pen. It takes just a minute and makes a world of difference when your finished flower looks beautifully balanced.
Experiment with floss strands for different effects — two strands give a delicate, airy feel perfect for small flowers, while four or six strands create plump, lush petals with lovely dimension. Don’t be afraid to play around and see what you love most!
Use the lazy daisy stitch on its own to create a simple rain drop or group them to make things like flowers.
By the way, did you know that the lazy daisy stitch goes by another name? It’s also called the detached chain stitch, and once you know a little about the chain stitch, that name makes perfect sense!
The chain stitch is a beautiful hand embroidery stitch where loops are linked together one after another, each one anchoring the next, forming a continuous chain along a line. It’s elegant, versatile, and wonderfully satisfying to sew.
Now, imagine taking just one of those little loops and setting it free — detaching it from the chain so it stands alone on the fabric. That’s exactly what the lazy daisy stitch is! Each petal is essentially a single, unconnected chain stitch loop, held in place by that sweet little anchor stitch at the tip.
So whether you call it lazy daisy or detached chain, you’re really working with the same friendly loop — just in a different context. Knowing this little connection can actually help your stitching too, because if you ever want to try the full chain stitch, you’ll already feel right at home. You’ve been making those loops all along!
As always, here’s a video tutorial to end the lesson.
Video: Lazy Daisy Stitch Tutorial
