

Learning how to start cross stitching is easier than it looks. Once you have your pattern, fabric, needle, and embroidery floss ready, there are just a few simple steps to follow.
In this beginner-friendly guide, I’ll walk you through how to prepare your fabric, find the center of your pattern, prepare and start your thread, make your first cross stitch, and work your way through a pattern. I’ll also explain the other cross stitch stitches you may come across, including half stitches, quarter stitches, backstitch, and French knots.
If you’re completely new to cross stitch, don’t worry. You don’t need to know everything before you begin. Start with the basic X-shaped stitch, take your time, and you’ll be stitching away before you know it!
Disclosure: As an Amazon Associate, I earn from qualifying purchases at no extra cost to you.
Choose a Simple Cross Stitch Pattern
If this is your first project, look for a small, simple cross stitch pattern with a manageable stitch count and just a handful of colors.
A smaller design is easier to keep track of and gives you a chance to get comfortable with the basics without feeling overwhelmed.
Once you’ve gained some experience, you can move on to larger and more detailed designs.
If you haven’t gathered your supplies yet, my Cross Stitch for Beginners: A Simple Guide to Getting Started walks you through the basics of choosing your fabric, needle, floss, and other supplies.
Prepare Your Cross Stitch Fabric
For a first project, 14-count Aida fabric is a great choice. The holes are large enough to see easily, making it a little easier to learn where your needle needs to go.
Cut your fabric a few inches larger than the finished design. This gives you enough room to hold the fabric in a hoop and leaves space around your finished stitching for framing or finishing.
If you’re using a hoop, you’ll want enough extra fabric around your design for the hoop to grip securely.
If you need help getting your fabric into a hoop, see our guide on how to hoop fabric.
Find the Center of Your Fabric
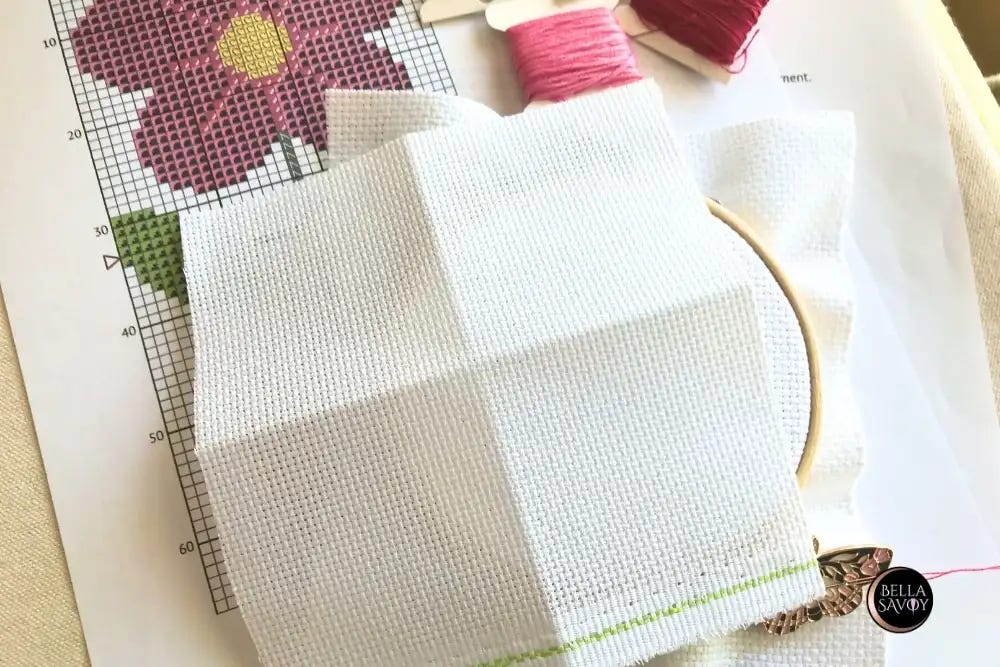
Most cross stitch patterns are designed to be started from the center. Finding the center of your fabric helps you position your design correctly and gives you a good starting point for your first stitches.
The easiest way to find the center is to fold your fabric in half from top to bottom, then fold it in half from side to side. The point where those folds meet is the center.
You can make a tiny mark at the center with a removable fabric marker, or simply use the crease as your guide.
Your cross stitch pattern will usually show you where its center is, too. Start by matching the center of the pattern with the center of your fabric.
Prepare Your Embroidery Floss
Embroidery floss is made up of several individual strands. For most cross stitch projects on Aida, you’ll use two strands of embroidery floss.
Cut a piece of floss about 18 inches long. Separate out the two strands you need, then thread them through your needle.
Try not to make your working length too long. Longer pieces tend to tangle and can wear out as you stitch.
If your particular pattern gives you different floss or strand instructions, always follow the pattern designer’s directions.
How to Start Cross Stitch Without a Knot
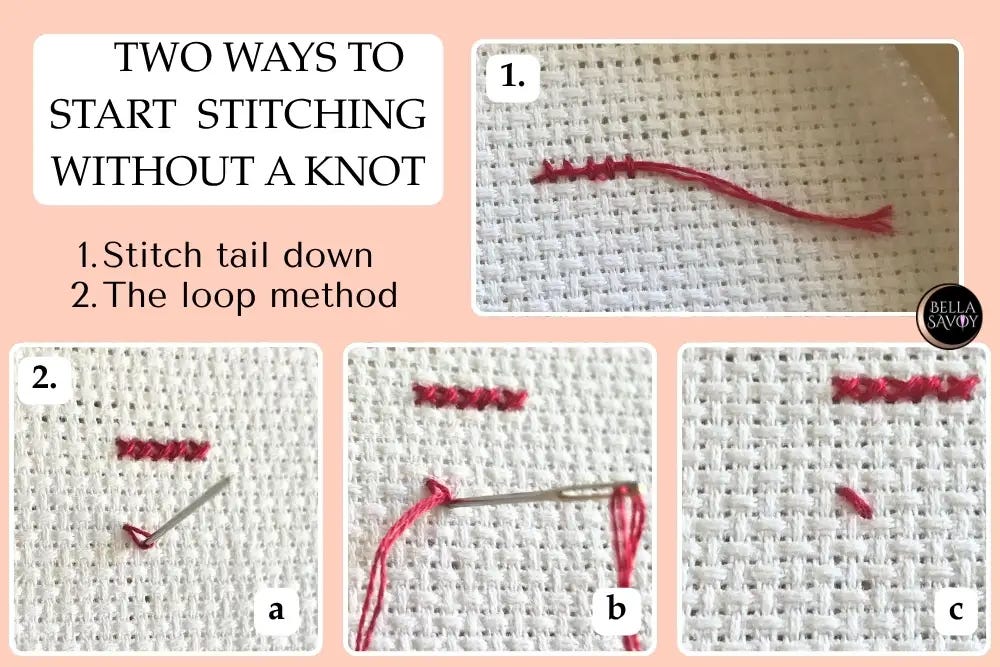
One of the nice things about cross stitch is that you generally don’t need to tie a knot to start stitching.
You can leave a short tail of floss on the back of your fabric and hold it in place while you make your first few stitches. Your stitches will secure the tail to the back of the fabric.
Once the thread is secure, trim away the excess.
This keeps the back of your cross stitch project neater and avoids bulky knots.
How to Start Cross Stitch With the Loop Method
There’s also the loop method, which is another clean way to start a piece of embroidery floss—and it’s my personal favorite.
To use the loop method:
Begin with an extra-long strand of embroidery floss and fold it in half, creating a loop at one end.
Thread your needle with the two cut ends of the floss, leaving the looped end free.
Bring the needle down through the top of the fabric where you want your first stitch to begin and leave behind the loop, then bring your needle up where you want your half stitch to end and make sure to go through the loop (a).
Pull your needle through then return to the back where you came up, making sure you are not going back through the loop (b). In other words, just outside of the loop.
The result (c) is your first half stitch.
And that’s it! Your thread is anchored without a knot.
How to Make Your First Cross Stitch
Now for the fun part!
A basic cross stitch is made from two diagonal stitches that form an X. This is the most common stitch you’ll use, and many cross stitch patterns use little more than these simple X-shaped stitches.
Bring your needle up through one hole in the fabric and down through the opposite hole. Then bring it back up through the next hole and down through the remaining hole to complete the X.
Once you’ve made a few, the motion becomes second nature.
Which Direction Should Your Cross Stitches Go?
Try to make all of the bottom stitches in the same direction, and all of the top stitches in the opposite direction.
For example, your bottom stitches might all run from lower left to upper right, while your top stitches run from upper left to lower right.
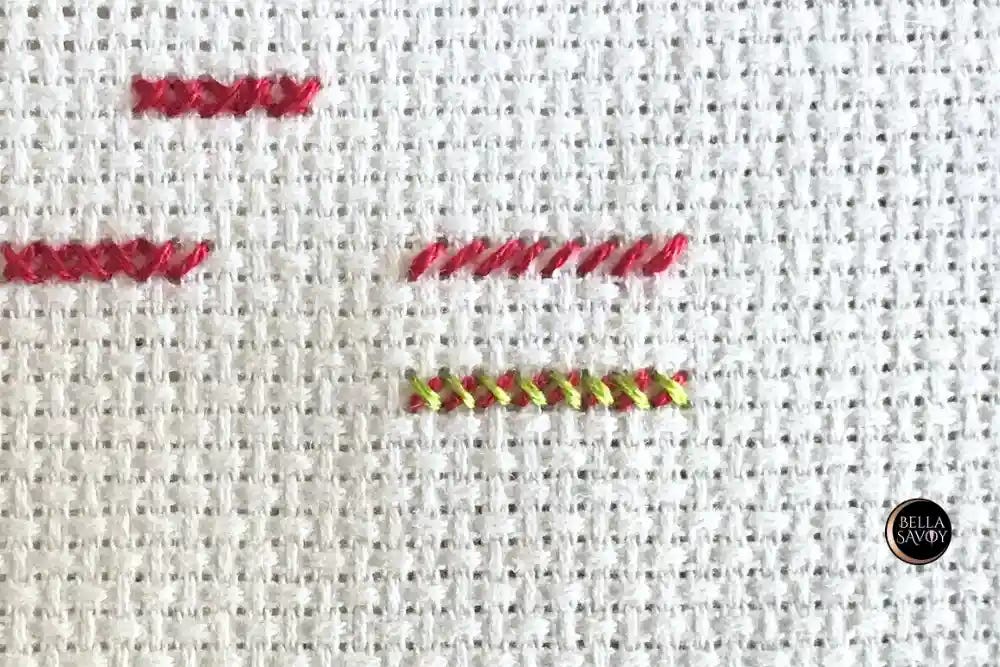
There’s no universal rule about which direction your stitches need to face. Consistency is what matters.
You can also experiment with how you work your stitches. Some stitchers make each X one at a time, while others work a row of diagonal stitches first and then come back to complete the Xs.
Try both methods and see which feels most comfortable for you.
Work Your Cross Stitch in Small Sections
You don’t have to figure out the entire pattern before you begin.
Choose a small section near the center and start stitching. As you become more comfortable, work your way outward.
If your pattern has several colors, it can help to finish one color in a small area before moving on to another. This keeps things manageable and makes it easier to see where you are.
If you’re using a digital pattern, one of my favorite apps to use is Pattern Keeper. You can mark off your stitches as you work, which makes it much easier to keep your place.
Don’t worry if you make a mistake, either. Cross stitch is very forgiving, and stitches can be removed when necessary.
Other Cross Stitch Stitches You May See
The basic cross stitch is the most commonly used stitch in cross stitch, especially in beginner-friendly patterns.
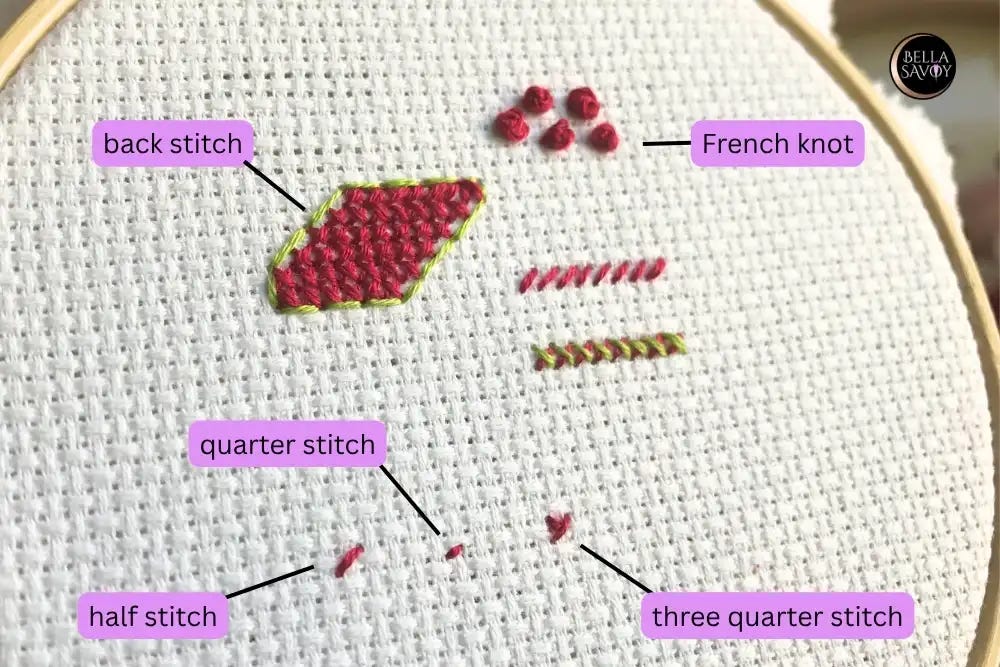
As you explore different designs, though, you may come across half stitches, quarter stitches, three-quarter stitches, backstitch, and French knots.
These stitches can add outlines, fine details, shading, texture, and other little touches to your designs.
You don’t need to master all of these before starting your first project. It’s simply helpful to know what they are when you come across them in a pattern.
Half Stitch
A half stitch is even simpler than a full cross stitch. Instead of making a complete X, you make just one diagonal stitch across the fabric square.
Half stitches are often used for shading, backgrounds, or areas where a softer or less-filled-in look is needed.
Your pattern will show you where to place them and which direction the stitch should go.
Quarter Stitch
A quarter stitch is even smaller. Instead of stitching all the way across a fabric square, the stitch ends in the middle of the square.
Quarter stitches can be useful for creating small details and smoother edges, especially around curves or shapes that don’t fit neatly into full fabric squares.
They can look a little strange the first time you see one on a pattern, but don’t let them intimidate you. Your pattern should show you exactly where they belong.
Three-Quarter Stitch
A three-quarter stitch combines a half stitch and a quarter stitch.
It’s often used for small details or shapes that need more definition than a full cross stitch can provide.
Three-quarter stitches can look a little different depending on the pattern, so the most important thing is to follow the chart and pattern instructions rather than trying to guess how the stitch should look.
Helpful tip: If your pattern includes fractional stitches, check the pattern key or instructions before you start stitching that area. The designer should indicate how they should be worked.
Backstitch
The backstitch is one of the most useful stitches to learn after the basic cross stitch.
A half stitch is one diagonal stitch within a fabric square, while a backstitch creates a continuous line that can span one or several fabric squares.
Backstitch is commonly used to add outlines, lettering, facial features, stems, and other small details to a design.
You may have a cross stitch design that looks a little unfinished until the backstitch is added. Those simple lines can really make the details stand out.
Backstitch is usually worked after you’ve completed the full cross stitches, although your pattern may give you different instructions.
French Knots
You may come across French knots in a cross stitch pattern from time to time. They add texture and dimension to your work, although they’re not especially common in beginner patterns.
They’re made by wrapping the thread around the needle to create a small knot on the surface of the fabric.
If your pattern calls for French knots, don’t worry—you don’t have to figure them out on your own. Check out our French knot tutorial for a step-by-step guide.
Tips for Working Different Cross Stitch Stitches
Once you move beyond the basic X, a few simple habits can make things easier.
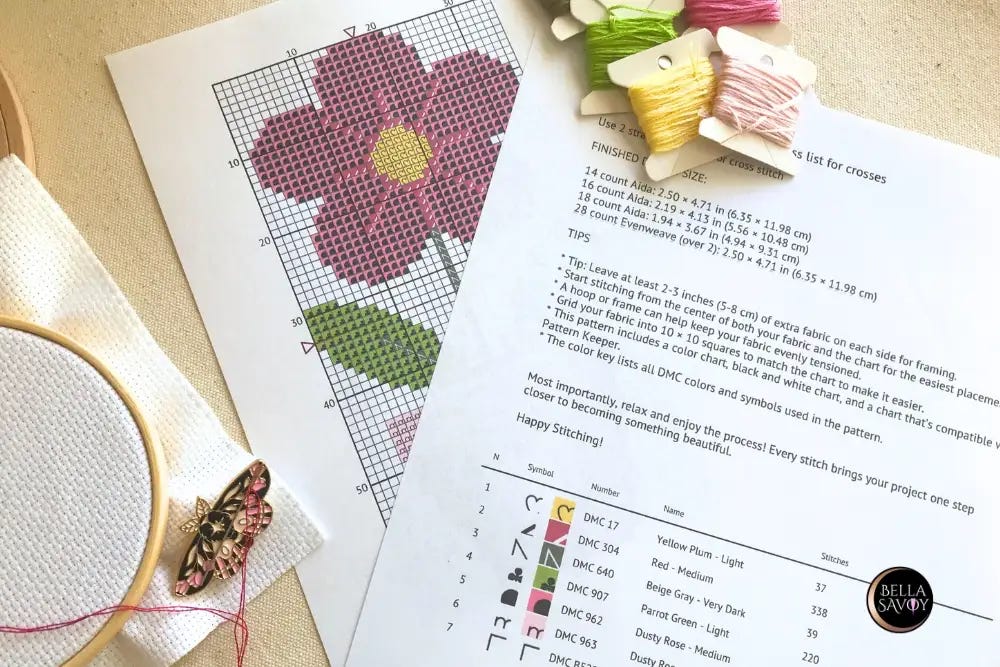
Read the instructions first. Before starting a section with fractional or specialty stitches, check your pattern’s instructions and key.
Use your pattern’s key. Designers may represent stitches differently, so always use the key that comes with your particular pattern.
Finish your full cross stitches first when possible. Many patterns have you add backstitch and other details after the main stitching is complete. This can make it easier to see where those details belong.
Take your time. Fractional stitches can feel awkward at first, especially when you’re used to filling an entire square with an X. They’ll become much easier with practice.
Don’t try to learn everything at once. If your first pattern only uses basic cross stitches, that’s all you need to worry about.
For more helpful beginner advice, check out 13 Cross Stitch Tips for Beginners.
How to Finish Your Cross Stitch Thread
When you’re finished with a length of floss, secure it on the back of your stitching by weaving it underneath a few stitches. Trim away the excess, and you’re ready to start with a fresh length of floss.
When you’re finished stitching for the day, remove your needle and store your project somewhere clean and dry.
If you’re using a hoop, you can leave your fabric in it between stitching sessions, but avoid keeping it stretched tightly in the hoop for long periods.
Frequently Asked Questions About Starting Cross Stitch
Where should I start a cross stitch pattern?
Most cross stitch patterns are designed to be started near the center. Find the center of both your pattern and fabric, then match the two together before making your first stitches.
How many strands of floss do you use for cross stitch?
For most cross stitch projects worked on Aida fabric, two strands of embroidery floss are used. However, always check your pattern instructions because the recommended number of strands can vary.
Do you tie a knot when starting cross stitch?
No, you generally don’t need to tie a knot when starting cross stitch. You can secure the end of your floss underneath your first few stitches or use the loop method.
What is the easiest fabric for cross stitch beginners?
14-count Aida is a popular choice for beginners because the holes are relatively large and easy to see. It makes it easier to learn where to place your needle as you’re getting started.
Is cross stitch easy for beginners?
Yes! Basic cross stitch is one of the easiest embroidery techniques to learn. The basic stitch consists of two diagonal stitches that form an X. Once you learn the motion and get comfortable with your fabric and thread, you’ll be ready to tackle simple patterns.
Don’t Worry About Perfect Stitches
And don’t worry if your first few stitches look a little wonky.
You’ll get more comfortable surprisingly quickly. The more you stitch, the more naturally your tension, spacing, and rhythm will develop.
You don’t need to master everything before you begin. Start with a few stitches, get comfortable with the rhythm, and enjoy the process.
Cross stitch is meant to be slow and relaxing, so grab your favorite drink, settle into your cozy spot, and take your time.
Your stitches don’t have to be perfect—they just have to be yours. Every finished project has its own handmade charm.