

How to Hoop Fabric for Embroidery (Step-by-Step Beginner Guide)
Learning how to hoop fabric is one of the first embroidery basics you’ll want to nail down, and the good news is it’s not hard once you know what you’re doing. A properly hooped piece of fabric makes a huge difference in the quality of your finished embroidery. It keeps your thread tension even, your stitches looking clean, and your design sitting right where you want it.
You can stitch without a hoop, but trust me — once you experience the difference a taut, well-hooped fabric makes, you won’t want to go back. Let’s walk through everything you need to know.
Disclosure: As an Amazon Associate, I earn from qualifying purchases at no extra cost to you.
Click Me for a Free Embroidery Pattern
Why Hooping Fabric Correctly Matters
Proper hooping isn’t just about keeping fabric in place — it directly affects how your stitches look when you’re done. When your fabric is hooped too loosely, too tightly, or at an angle, you can end up with:
Puckering or wrinkles in the fabric
Uneven or warped stitches from inconsistent thread tension
“Hoop burn” — permanent crease marks pressed into the fabric by the hoop
A design that shifts or slips mid-stitch
Getting into the habit of hooping carefully from the start will save you from a lot of frustrating do-overs.
What You Need to Hoop Fabric
Before we get into the steps, here’s what you’ll want to have on hand:
Embroidery hoop — any size works, but for beginners, a 6″ or smaller hoop is easiest to manage
Fabric — cut at least 1.5 to 2 inches larger than your hoop on all sides
Screwdriver — optional, but helpful for tightening the screw firmly
Hoop tape (optional) — for increasing grip on bamboo hoops (more on this below)
A quick note on fabric: stick to non-stretchy, medium-weight wovens while you’re learning. Quilting cotton, linen, and muslin all hoop beautifully and are very forgiving for beginners. Avoid knits and stretchy fabrics for now — those require extra techniques to hoop without distorting.
Choosing the Right Embroidery Hoop
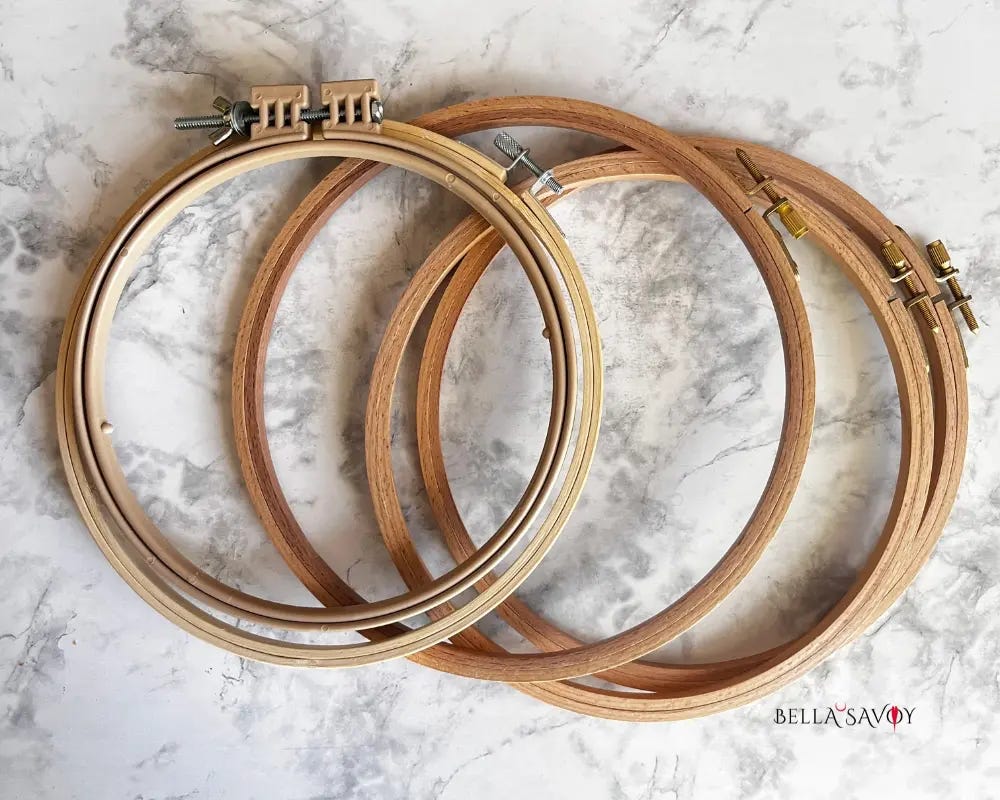
There are several types of embroidery hoops to choose from, and the material makes a real difference in how well your fabric stays in place.
Bamboo hoops are the most affordable and the most common starting point for beginners. They work well, but the tension between the inner and outer ring can be a bit loose, which sometimes lets fabric slip.
Beechwood hoops are pricier, but they’re my personal favorite. The quality is noticeably better — the fit between the two rings is tighter, which means your fabric stays put much more effectively. They also look beautiful if you’re finishing your embroidery as a display piece.
Plastic hoops can offer a firm grip and are often lighter than wood. Some have a lip on the inner ring that helps lock fabric in place. These are not as pretty but will still do the job.
Hoop size matters too. As a general rule, choose the smallest hoop that fits your design comfortably. A smaller hoop gives your fabric more support while you’re stitching and is easier to maneuver.
How to Hoop Fabric: Step-by-Step
Step 1: Loosen the screw
Turn the screw on the outer hoop counterclockwise to loosen it. You want the outer ring to be relaxed enough to separate from the inner ring easily.
Step 2: Separate the two rings
Lift the outer hoop away from the inner hoop and set it aside. Place the inner hoop flat on your work surface.
Step 3: Position your fabric
Lay your fabric right-side up over the inner hoop. Make sure your design or transfer is centered, with even fabric extending past the hoop on all sides. You want at least 1.5–2 inches of overhang all the way around.
Tip: If you’re right-handed, position the screw to your right before you start. If you’re left-handed, keep it to your left. This makes it much easier to tighten the screw once your fabric is in place.
Step 4: Press the outer hoop down
Place the outer ring over your fabric and inner hoop, lining everything up. Press down firmly to seat the outer ring back over the inner one. The fabric will be sandwiched between the two rings.
Step 5: Tighten the screw
Tighten the screw enough to hold the fabric in place — but don’t crank it all the way down just yet. You want some room to make adjustments.
Step 6: Pull the fabric edges taut
Holding the hoop in one hand, use your other hand to gently tug the fabric edges outward, working your way around the hoop. The goal is an even, drum-tight surface — when you tap the center of the fabric lightly, it should feel firm, like the head of a drum.
Pull gently and evenly. Don’t yank hard in one direction, as this can distort the weave of your fabric.
Step 7: Re-tighten the screw
Once your fabric is nice and taut, tighten the screw firmly. If you have a screwdriver, this is a great time to use it for a little extra security. Give the fabric one final check — if it’s loosened at all, pull and re-tighten again.
You’re ready to stitch!
Video Tutorial
The steps are simple, but sometimes it helps to see it in action. Here’s a quick video walkthrough:

Tips for Different Fabric Types
Not all fabrics hoop the same way. Here’s what to keep in mind as you work with different materials:
Quilting cotton — the easiest fabric to hoop. Crisp, stable, and holds tension well.
Linen — also excellent for hooping. Has a natural texture that grips the hoop well.
Muslin — great for practice. Very forgiving and easy to work with.
Loose weaves / gauze — trickier to hoop tightly. Try backing it with a layer of stabilizer (see below).
Stretchy fabrics and knits — these require special care. Hooping a knit without stabilizer can stretch and distort the fabric, resulting in puckered stitches once it’s released. If you’re working with a knit, use a cut-away stabilizer beneath your fabric to support it.
Thick or layered fabrics — loosen your hoop screw more than usual before hooping so the rings can accommodate the extra bulk.
What Is Stabilizer and Do You Need It?
If you’ve seen embroiderers talk about stabilizer, it’s simply a backing material that adds structure and support to your fabric while you stitch. For hand embroidery on a stable woven fabric, you often don’t need it. But it becomes very helpful when:
Your fabric is thin or loosely woven
You’re working on stretchy fabric
You want extra crispness in your finished stitches
Two common types for beginners:
Tear-away stabilizer — placed beneath your fabric in the hoop, then torn away after stitching. Good for woven fabrics.
Cut-away stabilizer — remains permanently behind the stitching after you trim the excess. Better for stretchy or knit fabrics, since tear-away can distort the stitches when removed.
How to Get More Grip from Your Hoop
If your fabric keeps slipping — especially in a bamboo hoop — there are a few easy fixes:
Wrap the inner hoop with twill tape or fabric strips. Cut a long, thin strip of cotton fabric and wrap it tightly around the inner hoop, overlapping as you go. Secure the end with a few stitches or a knot. This adds friction and helps grip your fabric much more securely.
Apply hoop tape. Edmunds EHT-1 Stitchers No-Slip Hoop Tape is a product made specifically for this. Apply it to the inner hoop (and optionally the outer) for an instant grip boost.
Use medical micropore tape in a pinch. I’ve done this myself in an emergency! Apply it to both hoops, and since it’s slightly wider than most hoops, you can easily tear off the excess along the perforated edge. It works surprisingly well.
Common Hooping Mistakes to Avoid
Even experienced embroiderers make these mistakes from time to time. Knowing about them in advance will save you a lot of trouble:
Fabric too small for the hoop: If your fabric doesn’t extend at least 1.5 inches past the hoop on all sides, it’ll be nearly impossible to pull taut — and it may slip right out. Always cut your fabric generously.
Over-tightening after hooping: Once your fabric is in the hoop, aggressively cranking the screw can create uneven tension across the surface. Instead, loosen, re-center your fabric, and re-hoop rather than just torquing the screw tighter.
Hooping on a slippery surface: If your hoop slides around while you’re trying to press the rings together, it makes the whole process frustrating. Try hooping on a non-slip mat or a rubber shelf liner — the grip makes a huge difference.
Not re-checking tension: After you finish tightening, always do a final check. Press lightly on the fabric center — if it gives or feels loose, pull and re-tighten.
Forgetting to center your design: It’s easy to lay fabric over the hoop without thinking about whether your design is centered. Before you press the outer ring down, double-check that your pattern is right where you want it.
Frequently Asked Questions
How tight should fabric be in an embroidery hoop?
Fabric in an embroidery hoop should be drum-tight — taut enough that lightly tapping the center produces a slight bounce, with no sagging or wrinkles. If the surface gives when pressed, pull the edges outward and re-tighten the screw before stitching.
What fabric is best for beginner embroidery hooping?
Quilting cotton is the best fabric for beginner embroidery hooping because it is stable, non-stretchy, and holds tension in the hoop without distorting. Linen is another excellent option. Avoid knits and stretchy fabrics until you are comfortable with the basics.
Can you hoop stretchy fabric?
Yes, you can hoop stretchy fabric by placing a cut-away stabilizer beneath it before hooping. The stabilizer prevents the fabric from stretching out of shape inside the hoop, which would cause puckering once the piece is removed.
What do you do if your fabric is too small for the hoop?
If your fabric is too small for the hoop, float it by attaching it to a larger piece of stabilizer using spray adhesive or pins, then hoop the stabilizer instead. This technique supports your fabric from behind without needing to hoop it directly.
You’re Ready to Hoop!
Once you’ve got the hang of hooping, it becomes second nature — just a quick routine at the start of every embroidery project. The key things to remember: use fabric with enough overhang, get that drum-tight tension before you lock the screw, and don’t be afraid to re-hoop if something feels off.
From here, you’re ready to start stitching! Check out these related posts to keep building your embroidery basics: