

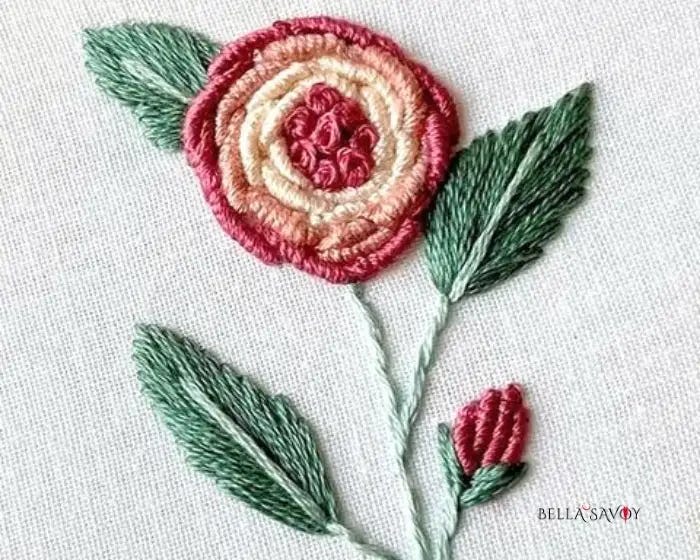
This step-by-step bullion stitch tutorial will show you exactly how to stitch this beautiful, raised flower embroidery stitch, adding rich texture and dimension to any embroidery project.
The bullion stitch—sometimes called the bullion knot—is a wrapped stitch that forms a smooth, rope-like coil. It’s perfect for creating tiny buds, bullion roses, wheat grains, textured hair, and other intricate details. It might look intimidating at first, but with a little practice, you’ll pick it up quickly.
At first glance, this embroidery technique can look like a simple straight stitch with extra “puff.” Some stitchers lovingly call it the little worm stitch because of its curled shape. But don’t let that scare you off. Once you understand the wrapping motion and get a feel for the tension, this stitch becomes incredibly satisfying—and surprisingly meditative.
That said, the bullion knot stitch isn’t considered a beginner stitch. Like the popcorn lazy daisy stitch, it requires both hands, steady coordination, and a bit of patience.
If you’re brand new to embroidery, you may want to start with foundational stitches first. But once you’re comfortable holding your needle while wrapping thread, this intermediate embroidery stitch opens up so many creative possibilities.
And if you’re a visual learner—don’t worry. A full bullion stitch video tutorial is included at the end of this guide so you can watch the entire process in real time.
Disclosure: As an Amazon Associate, I earn from qualifying purchases at no extra cost to you.
Click here for a FREE EMBROIDERY PATTERN
Bullion Stitch Tutorial (Step-by-Step)
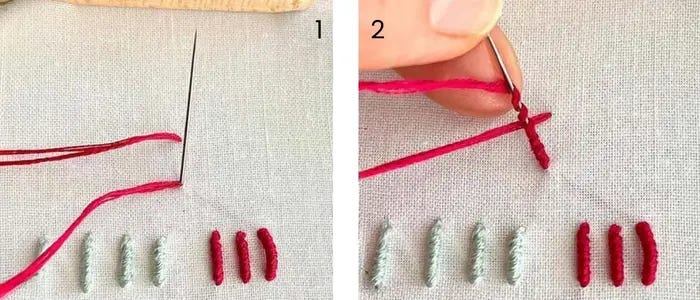
Form a loose base stitch (1):
Come up through the fabric and insert your needle back down a stitch-length away but leave a very loose stitch sitting on the surface.Bring your needle back up:
Bring the needle halfway up ner the starting point. Do not pull the needle through. Instead, hold your needle from below the fabric with one hand so it stays firmly in place.Begin wrapping the thread (2):
With your free hand, pick up the working thread from the end that the needle is sitting next to, and wrap it several times around the needle shaft, gently and neatly.Check the length of your wraps:
Slide the wraps gently down the needle toward the fabric to see how long your stitch will be. Add more wraps if needed—more wraps create a longer or more curved bullion stitch.Pull the needle through the wraps (3):
Pinch the wraps firmly but gently between your fingers and slowly pull the needle through until the wrapped thread sits snugly against the fabric.
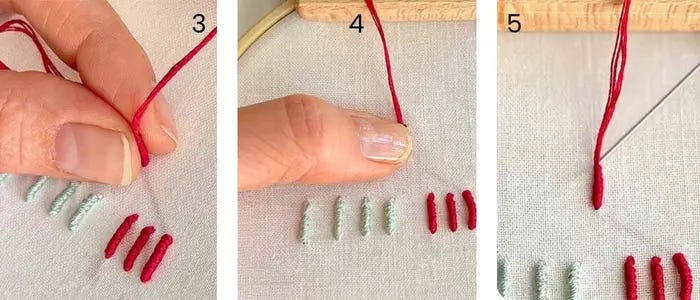
Settle the stitch (4):
Push the wrap snugly and neatly down. Slow, steady movements help maintain the stitch’s shape and tension. If the needle feels stuck, gently twist the wrap—not too much—just enough to loosen it. If any wraps fall out of place, don’t panic. Use the tip of your needle to nudge them into a smooth, even coil.To finish the stitch (5):
Next, push the needle down to the back of the fabric to secure it in place.
The first few bullion stitches you make might look a little wild, so don’t feel discouraged. This is a technique that rewards patience. Once your hands learn the rhythm, the stitch becomes incredibly enjoyable—and very addictive.
For a beautiful floral effect, try making a cluster of french knots and then work bullion knots around them to form a soft, spiraled bullion stitch flower. This is one of my favorite ways to embroider roses. You can also experiment with wrap counts to create a mix of textures and curves.
Tips for a Smooth Stitch
Use quality thread. High-quality embroidery threads like DMC have a smooth, firm texture that helps the thread glide through your wraps without snagging.
Choose the right needle. Because you’ll be pulling the needle through your wraps, a slim needle eye is essential — a bulky eye makes that pull-through much harder. Standard DMC embroidery needles work well as long as you don’t wrap too tightly, but if you find yourself struggling, switch to a milliner’s (straw) needle. Its uniform width from tip to eye makes it ideal for bullion stitches and knots.
Watch your tension. Wrapping too tightly makes the pull-through difficult; too loosely and the stitch looks uneven. Aim for snug but not stiff wraps, and adjust as you go.
Mind your strand count. Fewer strands are generally easier to manage with bullion stitches. If you’re just learning the stitch, start with two strands before working up to more.
Hold your wraps as you pull through. Use your thumb and index finger to gently hold the wraps against the needle as you pull it through. This keeps them from sliding around and gives you a neater, more even stitch.
Keep your fabric taut. The pulling motion of this stitch can pucker loosely held fabric. Work with your fabric in a hoop or use a stabilizer to keep it firm and flat.
Stitch in any direction. This stitch isn’t directional, so feel free to work at whatever angle suits your design. In this tutorial, we’ll stitch vertically so the technique is easy to follow.
Extra wraps = natural curve. If you add more wraps than your stitch length calls for, the stitch will begin to curve on its own. Want a more dramatic arc? Just keep adding wraps.
Ideas & Embroidery Inspiration
The bullion stitch is one of the most versatile textured stitches in hand embroidery. Here are a few ways to use it:
Roses: Create a cluster of French knots in the center, then surround them with short bullion stitches to form realistic petals.
Wheat grains or lavender sprigs: Long, slightly curved bullion knots make beautiful botanical elements.
Hair texture: Multiple short bullions add dimensional curls or braids to portrait embroidery.
Textured fills: Use alternating lengths of bullions to fill shapes with a rich, sculptural effect.
Once you get comfortable, you’ll find yourself adding bullion knots everywhere — they’re just that fun.
Video Tutorial
If you’re struggling to master the motion or want to see the wrap technique in action, watch my video tutorial below. Seeing the stitch in real time can help everything click.
