🖤 Learn how to transfer patterns quickly and easily using a home printer! This method is not only precise, but it also simplifies the entire embroidery process—making it one of the best ways to print on fabric with a home printer for embroidery projects. If you’ve ever struggled with traditional transfer methods, this embroidery tutorial will show you a game-changing approach that ensures crisp, clean lines every time.
The first time you transfer patterns using a home printer, you’ll wonder why you didn’t try it sooner. It’s fast, effortless, and incredibly reliable. I’ve tested multiple transfer methods over the years, but this one has become my go-to because it consistently produces perfect results. My designs always come out clear, well-placed, and ready to stitch—no smudging, no fading, and best of all, no extra steps to remove markings with heat or water when I’m finished.
Another great perk? It’s budget-friendly! If you already own a printer, you can start transferring embroidery patternsright away with minimal additional cost. And even if you don’t have a printer yet, investing in one (usually around $100) is still an affordable option—plus, you can use it for many other creative projects beyond embroidery.
I’ve personally transferred hundreds of embroidery patterns this way, and it has completely transformed my workflow. So many people have asked me how to do this, which is why today’s post is dedicated to breaking down the entire process for you.
If transferring embroidery patterns has ever felt like a hassle, I hope this tutorial changes that and makes it a step you actually enjoy!
Table of Contents
What You’ll Need
- Printer: Printers are pretty inexpensive and you can get a decent one for around $100 to $150, although you can find less expensive ones. You can use either an inkjet or a laser printer to transfer your patterns. I have a Brother laser printer and an Epson Workhorse inkjet printer and both work beautifully. If you want to wash your embroidery later though, only the laser print will be waterproof. This doesn’t mean your inkjet will definitely bleed if it gets wet. Printer inks are different from one brand to the next so reduce the opacity and test it out on fabric.
- Sticker Paper: I use Online Labels 8.5 x 11 inch sticker paper which is perfect for this job but any sticker paper in that size will do.
- Fabric, Scissors, and Your Pattern: Your fabric needs to be larger than your sticker paper and this process will be easier if you have an extra half an inch on all sides. Use fabric scissors, not embroidery scissors or your hand might cramp up after awhile. If you’ve printed your pattern onto paper already and it’s centered and looks good to you then you can use that when it’s time to transfer if your printer allows you to make copies.
Steps To Transfer Patterns
Step One
Lay your ironed fabric on a flat surface & set it aside.
Fold the backing of your sticker paper down about 2 inches and press the sticky part firmly down onto one end of your fabric like this:

Carefully lift the sticker paper slightly and slowly peel the backing away, inch by inch. As you do this, smooth the sticker down from the top onto your fabric until the entire backing has been removed.
Once the backing is off, give your sticker paper a firm rub over your fabric to ensure it’s securely in place for transferring patterns.
Next, turn your fabric over and smooth out any wrinkles, making sure your hands are clean to avoid leaving marks on the fabric.
Step Two
Next, trim the fabric to fit the sticker paper.

Next, set your fabric back down on a hard surface with the fabric side facing up. Place your backing on top—whether it’s a stabilizer or a simple sheet of paper—and firmly rub it down again, paying extra attention to the edges. Ensuring a strong bond is essential because if the backing comes loose inside your printer, it could cause a frustrating paper jam.
Once that’s secure, gently pinch along the edges of the fabric and pull outward to check for any loose threads. If you find any, simply remove them as they come off. Occasionally, you may need to trim a few stubborn threads with scissors. Afterward, go over the edges one more time, pressing firmly to make sure everything is properly adhered before you transfer patterns using your home printer.
I might be a bit obsessive when it comes to making sure the edges are perfectly secured, but trust me—it’s worth the extra effort to avoid a printer jam later! Taking a few extra seconds now can save you from frustration when it’s time to print on fabric with a home printer and start stitching your embroidery pattern.
Step Three
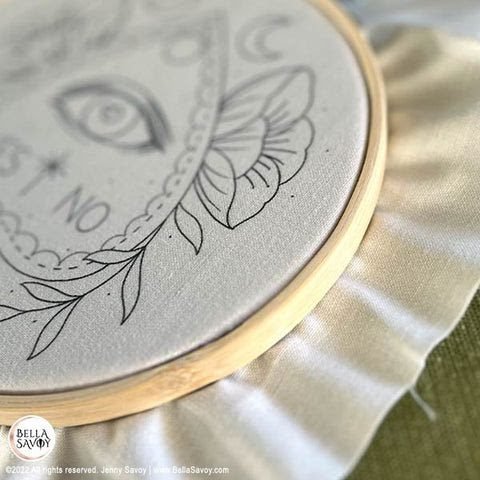
Before you transfer embroidery patterns onto fabric, make a test print on paper at around 40% opacity. Lighter lines means it’ll be less likely to show behind your stitches.
If your test comes out perfect and centered replace all paper in the tray with your fabric/sticker paper, and print with the settings on plain paper & normal quality.
Tip: Be sure you set your fabric in the tray so you’re printing on the fabric, not the sticker.
Step Four
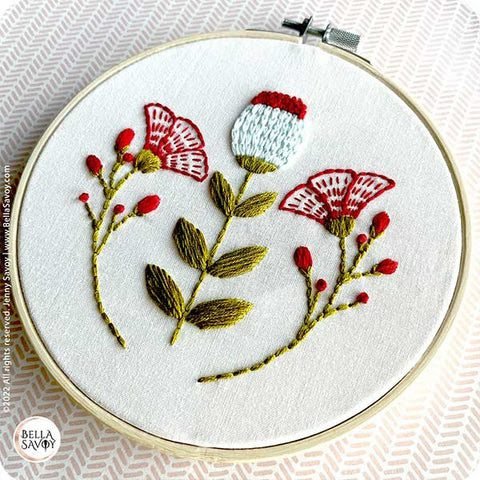
How did it print for you? Now all you have to do is carefully remove the sticker and you’ll be left with your printed pattern. Hoop and stitch right away! Yay!

FAQ’s
Can I reuse the sticker paper?
Yes, you can transfer patterns a few times using the same sticker paper. However, as the stickiness decreases, it increases the chances of a printer jam. I recommend reusing the sticker paper no more than 2 or 3 times to avoid any issues when doing embroidery transfers.
What if I want to transfer patterns meant for an 8-inch hoop?
Unless you have a wide-format printer, you’re typically limited to an 8-inch hoop with most standard printers. If you’re using fabric that’s 8.5 x 11 inches, it may slip along the narrow side. Here’s a quick workaround:
- Transfer patterns using the same method from your embroidery tutorial.
- Sew an additional 1.5-inch wide piece of fabric along each narrow side.
- The sewn-on pieces won’t show on the front, so you can easily hoop the fabric into your 8-inch hoop.
Will this work on dark fabric?
This method won’t work if the fabric is too dark. For dark fabric, you’ll need to use other methods to transfer patterns, like tracing with white carbon paper, or using other embroidery transfers designed for darker fabrics.
Won’t this jam up my printer?
Some printers can be finicky, so there’s always a chance of a jam when you transfer patterns this way. I’ve never had issues with my printers, but I always make sure my fabric is securely stuck to the sticker paper and remove any other paper from the tray before printing. It’s important to ensure a smooth embroidery transfer to prevent mishaps.
Why do you remove all other paper out of your tray to print fabric?
My printer sometimes tries to grab both the fabric and an extra sheet of paper, which results in the paper getting printed on instead of the fabric. While this hasn’t caused a jam for me, it could with other printers, so I make it a habit to reduce any potential printing problems by clearing the tray before doing any embroidery transfers.
I hope you’ve enjoyed this embroidery tutorial and will use this method to transfer patterns for most of your embroidery projects!
If you like the mandala pattern I used for this tutorial and want to follow along with me as I stitch, head over to that post and download the free pattern. I’ll include all the colors and stitches!
I hope this method works out for you, but if you don’t have a printer and need an alternative, I’ve posted other methods to transfer patterns as well.